
Are you ready to embark on the exciting journey of assembling your very own portable garage? Look no further, as this step-by-step guide is here to lend you a helping hand. From gathering the necessary tools to perfectly aligning the sturdy structure, we will take you through each stage, ensuring a seamless and hassle-free experience. So, roll up your sleeves, grab your tools, and let’s dive into the world of portable garages together!
Step-by-Step Guide: Assembling a Portable Garage
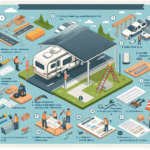
If you’re looking to assemble a portable garage, you’ve come to the right place! In this step-by-step guide, we will walk you through the entire process, from preparing the site to organizing the interior and providing maintenance and care tips. Whether you’re a seasoned DIY enthusiast or a beginner, these instructions will make your portable garage assembly a breeze.

Step 1: Preparing the Site
The first step in assembling a portable garage is to prepare the site. This involves clearing the area where the garage will be placed, ensuring there are no obstacles such as rocks or debris. By clearing the area, you prevent any potential damage to your portable garage and provide a clean and level surface for installation.
After clearing the area, it’s important to level the ground. This can be done using a shovel or a leveling tool, ensuring that the ground is even and stable. Leveling the ground will help maintain the structural integrity of your portable garage and prevent any issues that may arise from uneven surfaces.
Next, it’s crucial to check for underground utilities. This step ensures that you avoid damaging any water, gas, or electrical lines while installing your portable garage. Contact your local utility company to request a utility marking service, which will identify any underground utilities and help you avoid potential accidents or disruptions.
Step 2: Unpacking the Components
Once the site is prepared, it’s time to unpack the components of your portable garage. Start by identifying the different parts included in the package. The instruction manual that comes with your portable garage will provide a detailed list of all the components, making it easier for you to ensure that everything is available.
After identifying the parts, organize them in a systematic manner. Follow the instructions provided in the manual to understand how the components should be grouped and arranged. Organizing the components will save you time during the assembly process and prevent any confusion or misplacement of parts.
Furthermore, be sure to inspect each component for any damage. Look for any signs of cracks, dents, or other defects that may affect the integrity of your portable garage. If you notice any damage, contact the manufacturer or supplier for assistance. It’s important to address these issues before proceeding to ensure a sturdy and reliable structure.
Step 3: Erecting the Frame
With the components organized and inspected, it’s time to start erecting the frame of your portable garage. Begin by attaching the base rails according to the instructions provided. The base rails provide stability and support, so be sure to follow the manufacturer’s guidelines to ensure proper attachment.
Once the base rails are in place, connect the main frame. This step involves joining the frame sections together using the provided connectors or fasteners. Take your time to align the sections correctly, ensuring a secure connection. A stable and well-connected main frame is vital for the overall strength of your portable garage.
To secure the frame, use the bolts provided by the manufacturer. Tighten them properly to prevent any movement or wobbling. It’s essential to follow the recommended torque specifications to avoid overtightening or undertightening, which can compromise the stability of the frame.

Step 4: Installing the Roof
After erecting the frame, it’s time to install the roof of your portable garage. Start by attaching the roof trusses to the main frame. Follow the instructions carefully to ensure proper alignment and secure attachment. The roof trusses provide structural support and distribute the weight evenly, so it’s crucial to install them correctly.
Once the roof trusses are in place, fix the roof cover according to the manufacturer’s guidelines. Ensure that the cover is pulled taut and securely fastened to prevent any sagging or flapping during strong winds. This step protects your belongings from rain, snow, and other environmental elements.
To secure the roof, use screws provided with the portable garage. Be sure to tighten them adequately without overtightening to avoid damaging the roof cover or creating unnecessary stress on the structure.
Step 5: Assembling the Walls
With the roof installed, it’s time to assemble the walls of your portable garage. Start by connecting the wall panels together, following the instructions provided in the manual. This step may require some assistance, as the wall panels can be large and heavy. Ensure that the panels are properly aligned and securely fastened for stability.
If your portable garage includes door frames, position them according to the instructions. Follow the manufacturer’s guidelines to ensure correct alignment and secure attachment. Door frames provide entry and exit points, so it’s essential to install them accurately to avoid any issues with accessibility.
Additionally, if applicable, add windows to your portable garage. Depending on your needs and preferences, windows can enhance the aesthetics and functionality of the structure. Follow the instructions provided to install the windows correctly and ensure a tight seal to prevent drafts and water leaks.
Step 6: Securing the Structure
Ensuring the stability and durability of your portable garage is crucial, especially when facing harsh weather conditions. To achieve this, it’s important to secure the structure properly. Start by staking the structure to the ground. Use sturdy stakes or anchors provided by the manufacturer to prevent any movement or shifting during high winds or storms.
In addition to staking, use anchor cables to provide extra stability to your portable garage. These cables are attached to the base of the structure and anchored securely into the ground. By utilizing these anchor cables, you add another layer of protection against strong winds or heavy snow.
Depending on the size and design of your portable garage, additional bracing may be necessary to enhance stability. Consult the instructions provided by the manufacturer to determine if any additional bracing is required. By following these guidelines, you ensure that your portable garage withstands the test of time and remains structurally sound.
Step 7: Adding the Doors and Vents
Now that your portable garage is secure, it’s time to add the doors and vents. If your portable garage includes roll-up doors, install them according to the instructions provided. These doors offer easy access to your belongings and ensure convenient entry and exit. Proper installation is crucial to ensure smooth operation and prevent any issues with functionality.
In addition to roll-up doors, you may have a side door included in your portable garage. Mount the side door according to the manufacturer’s guidelines, ensuring correct alignment and secure attachment. The side door provides an alternative access point and can be beneficial for convenience and flexibility.
To maintain proper airflow and ventilation within your portable garage, attach ventilation systems as instructed. These systems prevent the buildup of heat, humidity, and odors, creating a more pleasant environment for storage or workspace purposes. Follow the manufacturer’s guidelines to install the ventilation systems correctly.
Step 8: Finishing Touches
Once the structure and components of your portable garage are in place, it’s time to focus on the finishing touches. Start by sealing the seams to prevent water leaks and drafts. Use the sealant recommended by the manufacturer and follow their instructions to apply it properly. Sealing the seams adds an extra layer of protection and helps maintain a weatherproof environment.
Additionally, adding weatherproofing measures is essential to protect your belongings from the elements. Apply weatherstripping tape or silicone sealant to doors, windows, and other openings to create a tight seal. This step minimizes the potential for water infiltration and ensures a secure and climate-controlled interior.
Before considering your portable garage assembly complete, inspect the structure for any remaining issues. Look for any loose or missing fasteners, damaged components, or any other signs of potential problems. Address these issues promptly by contacting the manufacturer or supplier for assistance. Taking care of these remaining issues guarantees your portable garage’s reliability and longevity.
Step 9: Organizing the Interior
With your portable garage successfully assembled, it’s time to turn your attention to organizing the interior. Start by planning the layout based on your specific needs and preferences. Determine the optimal placement for shelving units, taking into consideration access, storage capacity, and ease of use.
Installing shelving units provides efficient storage solutions and helps keep your portable garage tidy and organized. Follow the manufacturer’s instructions to assemble and secure the shelves properly. Consider using sturdy and adjustable shelves to accommodate various sizes of equipment and tools.
Once the shelving units are in place, it’s time to arrange your tools and equipment. Group similar items together for easy access and efficient use of space. Consider using wall hooks or pegboards to hang frequently used items and maximize the available area. A well-organized interior ensures that your tools and equipment are readily accessible whenever you need them.
Step 10: Maintenance and Care
To ensure the longevity and optimal performance of your portable garage, regular maintenance and care are essential. Incorporate these practices into your routine to keep your structure in top shape.
Regular cleaning and dusting of the interior and exterior surfaces help prevent the buildup of dirt, debris, and corrosive materials. This step not only keeps your portable garage visually appealing but also prevents potential damage caused by contaminants.
Periodically check your portable garage for any signs of wear and tear. Look for cracks, tears, or any other damage that may compromise the structural integrity. Address these issues promptly by contacting the manufacturer or supplier for necessary repairs or replacement parts. Early intervention prevents further damage and ensures the long-term durability of your portable garage.
By following this comprehensive step-by-step guide, you’ll be able to assemble your portable garage with ease and confidence. Remember to take your time, carefully read and follow the instructions provided by the manufacturer, and prioritize safety throughout the process. Enjoy the satisfaction and convenience of having a reliable and functional portable garage for your storage or workspace needs!